Array2Col Operator
Overview
The Array2Col operator lets you convert an array An array is a type of object that stores one or more data types. Data types supported in arrays include numbers, strings, and objects. into a column of values in a table. In Unqork, a table is an indexed array of objects An object is a type of data structure that represents a single, self-contained entity that acts as a container for the characteristics of that entity.. So, the Array2Col operator transforms an array of values into an array of objects.
You'll find the Array2Col operator under the Array group to the left of your Data Workflow canvas
About the Info Window
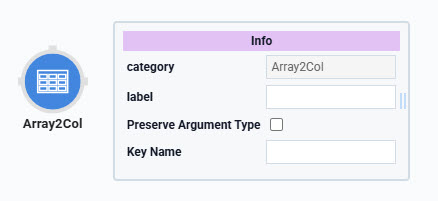
Learn more about each setting in the Array2Col operator's Info window:
|
Setting |
Description |
|---|---|
|
Label |
Sets the label for your operator, displaying below the operator on your Data Workflow canvas. This field is optional, but set a label if you use more than one of the same operator type. A label helps you identify your operators without opening any Info windows. |
|
Preserve Argument Type |
When selected, this setting ensures the argument data type is respected when the operator executes. |
|
Key Name |
Each value in the array becomes an object, formatted in the following way: {"key":"value"}. Enter a name for the key you want to use in each object. |
Adding an Array2Col Operator
In this example, you'll configure a Data Table component to serve as an input source to the Array2Col operator. Then, build a Data Workflow that uses the Col2Array operator to convert the table into an array An array is a type of object that stores one or more data types. Data types supported in arrays include numbers, strings, and objects.. This array will connect to the Array2Col operator in a second Data Workflow. While components like the Multi-Select Dropdown component can generate arrays, this example focuses on creating an array using the Col2Array operator.
These instructions assume you have a new module open, saved, and with a title.
Configure the Data Table Component
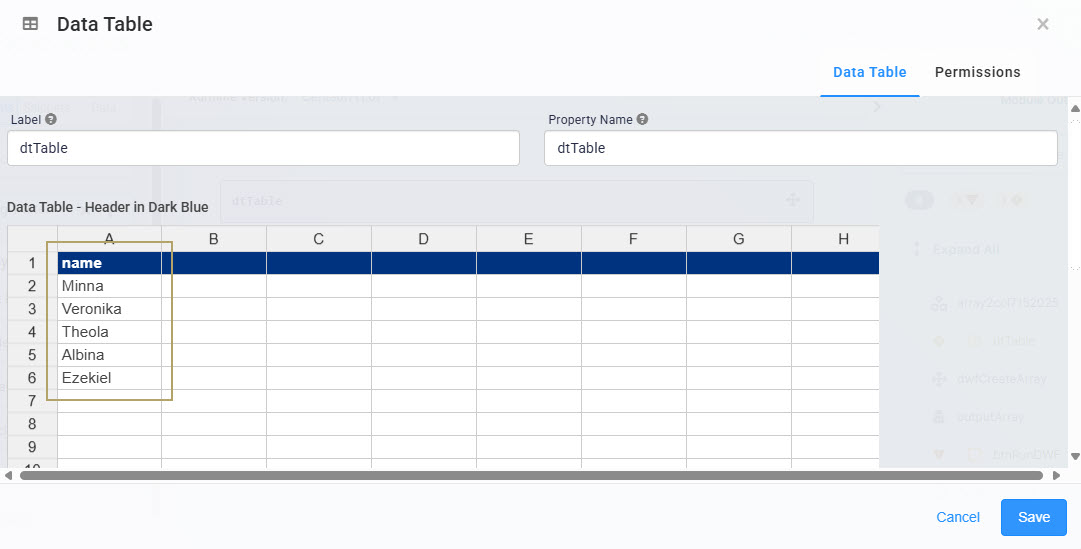
Begin by creating a Data Table component with sample data you'll use to convert into an array.
| 1. | In the Module Builder, drag and drop a  Data Table component onto your canvas. Data Table component onto your canvas. |
| 2. | In the Property ID A Property ID is the unique field ID used by Unqork to track and link components in your module. field, enter dtTable. |
| 3. | In the data table, enter the following: |
|
A |
|
|---|---|
|
1 |
name |
|
2 |
Minna |
|
3 |
Veronika |
|
4 |
Theola |
|
5 |
Albina |
|
6 |
Ezekiel |
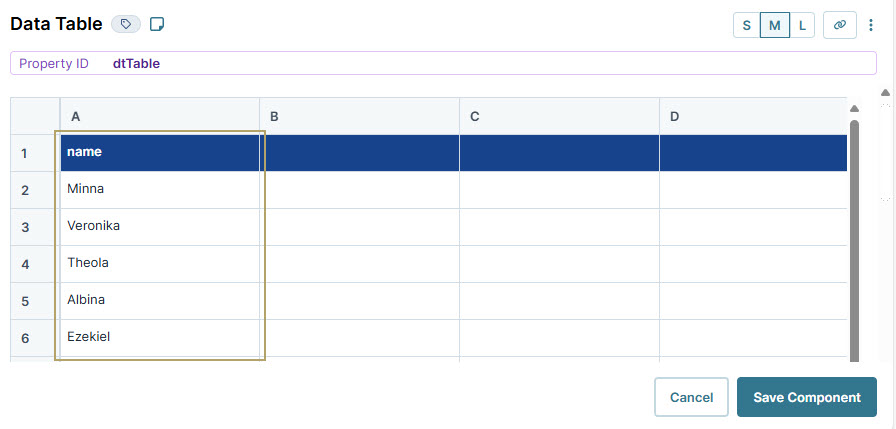
| 4. | Click Save Component. |
Configure the Hidden Component
Next, you'll configure a Hidden component to store the array output from the first Data Workflow component.
| 1. | Drag and drop a Hidden component onto your canvas, placing it below the Data Table component. |
| 3. | Click Save Component. |
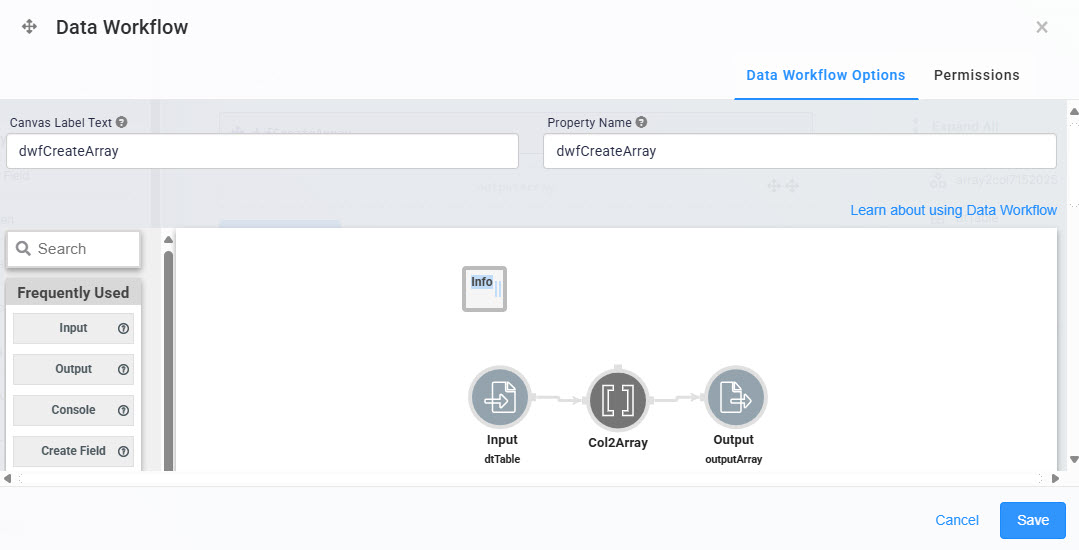
Configure the First Data Workflow Component
Configure the first Data Workflow component to retrieve the stored data from the Data Table component. Then, use a Col2Array operator to create an array from the sample data in your Data Table component.
| 1. | Drag and drop a Data Workflow component onto your canvas, placing it between the dtTableData Table and outputArray Hidden components. |
Configure the Input Operator
| 1. | Drag and drop an Input operator onto your Data Workflow canvas. |
| 2. | Configure the operator's Info window as follows: |
|
Info |
|
|---|---|
|
Category |
Input |
|
Component |
dtTable |
|
Required |
Yes |
|
Source |
Default |
Configure the Col2Array Operator
| 1. | Drag and drop a Col2Array operator onto your Data Workflow canvas. |
| 2. | Complete the operator's Info window as follows: |
|
Info |
|
|---|---|
|
Category |
Col2Array |
|
Label |
Col2Array Name |
|
Drop Empty |
Yes |
|
Path |
name |
|
Default Value |
|
The value you'll enter in the Info window's Path field should match the column header in your Data Table component.
| 3. | Connect the output port (right) of the Input operator to the input port (left) of the Col2Array operator. |
Configure the Output Operator
| 1. | Drag and drop an Output operator onto your Data Workflow canvas. |
| 2. | Complete the operator's Info window as follows: |
|
Info |
|
|---|---|
|
Category |
Output |
|
Label |
outputArray |
|
Action |
Value |
| 3. | Connect the output port (right) of the Col2Array operator to the input port (left) of the Output operator. |
| 4. | Click Save Component. |
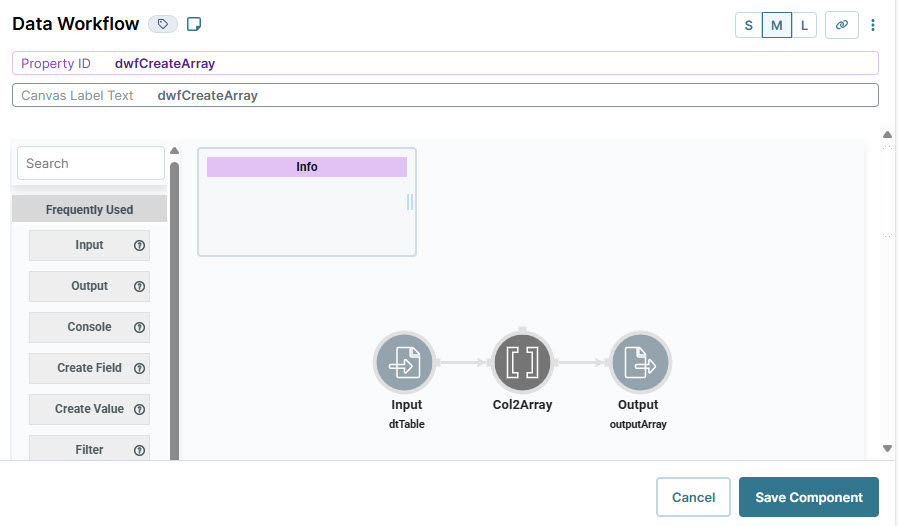
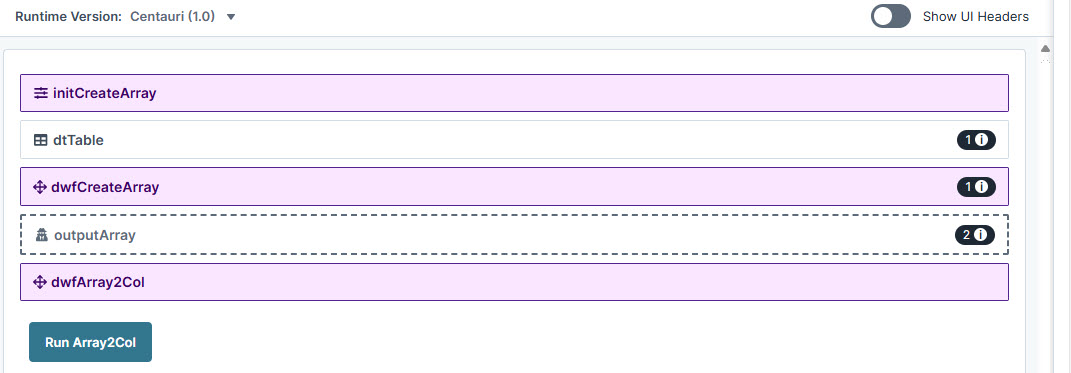
Here's how the completed Data Workflow looks:
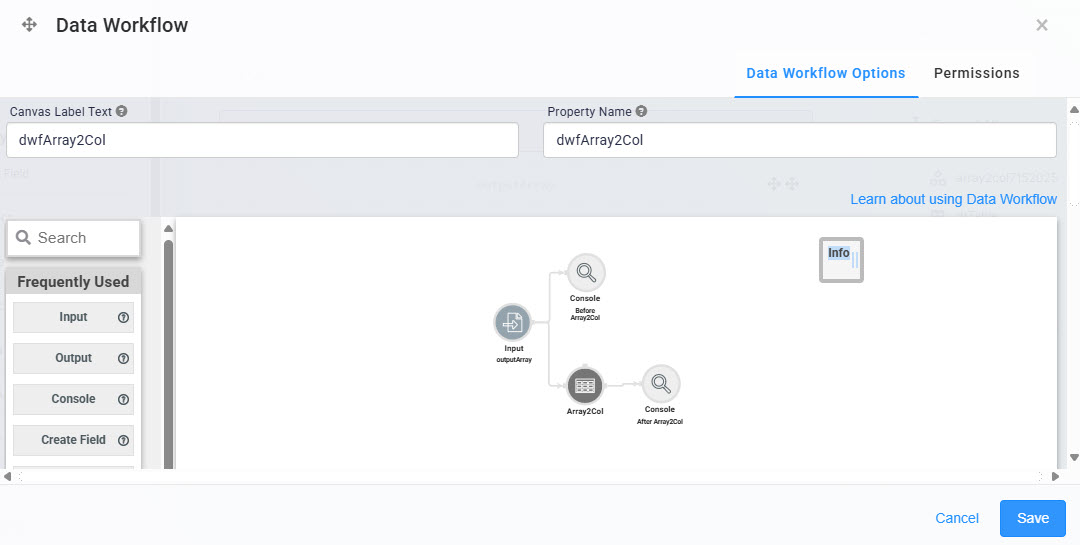
Configure the Second Data Workflow Component
Now set up a second Data Workflow component to test the Array2Col operator.
| 1. | Drag and drop a Data Workflow onto your canvas, placing it below the outputArrayHidden component. |
Configure the Input Operator
| 1. | Drag and drop an Input operator onto your Data Workflow canvas. |
| 2. | Configure the operator's Info window as follows: |
|
Info |
|
|---|---|
|
Category |
Input |
|
Component |
outputArray |
|
Required |
Yes |
|
Source |
Default |
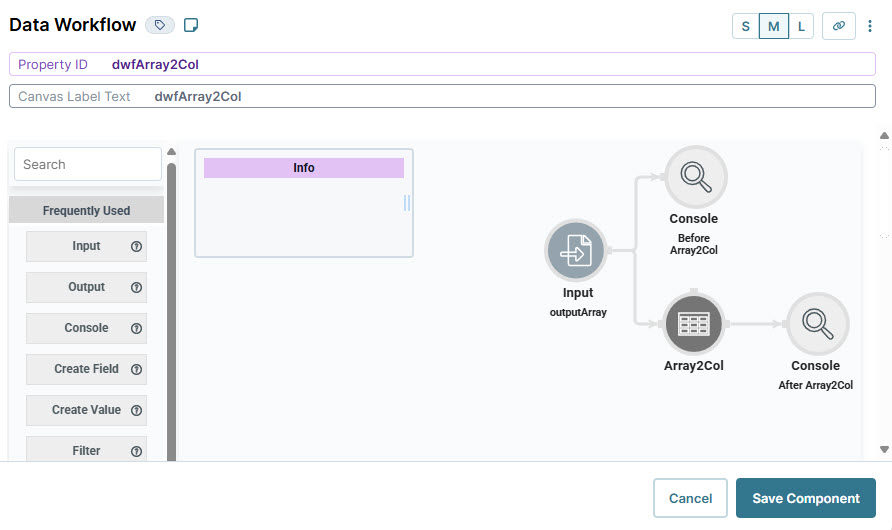
Configure the First Console Operator
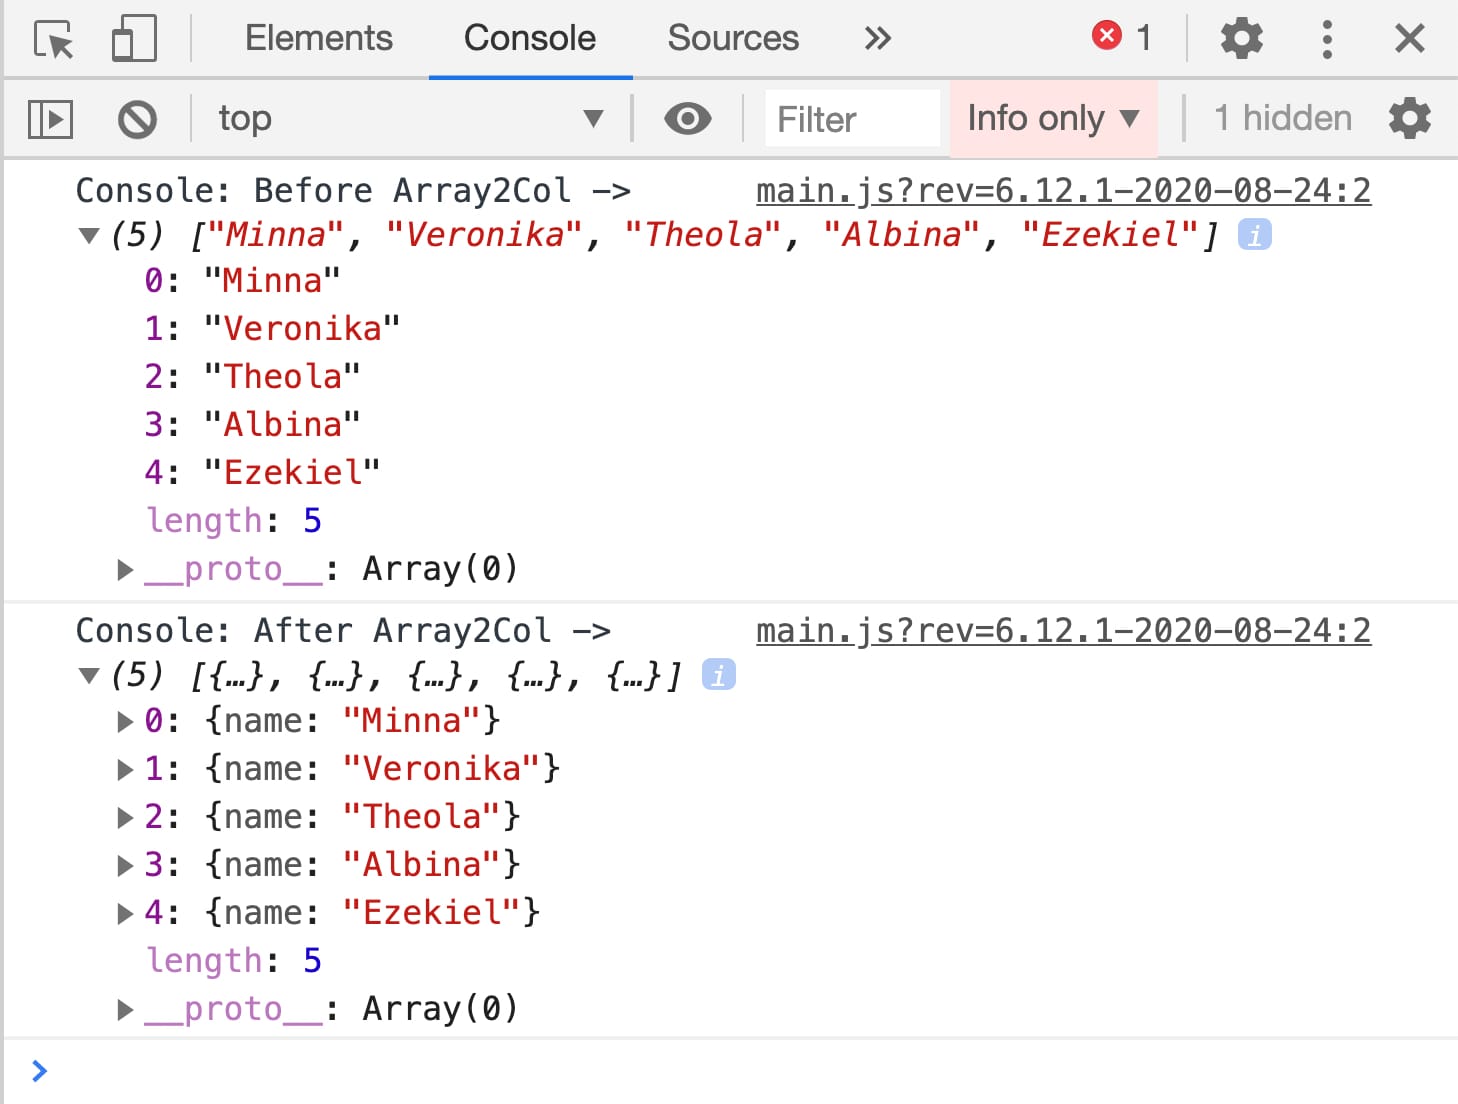
Add a Console operator to view your data before it’s converted. This operator displays the input data in your browser’s DevTools Console The DevTools Console helps you securely store, build, test, and deploy your software.. Later, you'll add another Console operator to compare the data after it passes through the Array2Col operator.
| 1. | Drag and drop a Console operator onto your Data Workflow canvas. |
| 2. | Complete the operator's Info window as follows: |
|
Info |
|
|---|---|
|
Category |
Console |
|
Label |
Before Array2Col |
| 3. | Connect the output port (right) of the Input operator to the input port (left) of the Console operator. |
Configure the Array2Col Operator
| 1. | Drag and drop an Array2Col operator onto your Data Workflow canvas. |
| 2. | Complete the operator's Info window as follows: |
|
Info |
|
|---|---|
|
Category |
Array2Col |
|
Label |
Array2Col Name |
|
Key Name |
name |
The value you'll enter in the Info window's Key Name field will become the key in each key/value pair created from the array.
| 3. | Connect the output port (right) of the Input operator to the input port (left) of the Array2Col operator. |
Configure the Second Console Operator
Lastly, you'll add a Console operator to view the result after the data passes through the Array2Col operator. When creating applications, you might also want to use a dedicated Output operator. Then, you could connect that Output operator to a Hidden component. This would let you store the final values and reference them elsewhere in your application.
| 1. | Drag and drop a Console operator onto your Data Workflow canvas. |
| 2. | Complete the operator's Info window as follows: |
|
Info |
|
|---|---|
|
Category |
Console |
|
Label |
After Array2Col |
| 3. | Connect the output port (right) of the Array2Col operator to the input port (left) of the After Array2Col Console operator. |
| 4. | Click Save Component. |
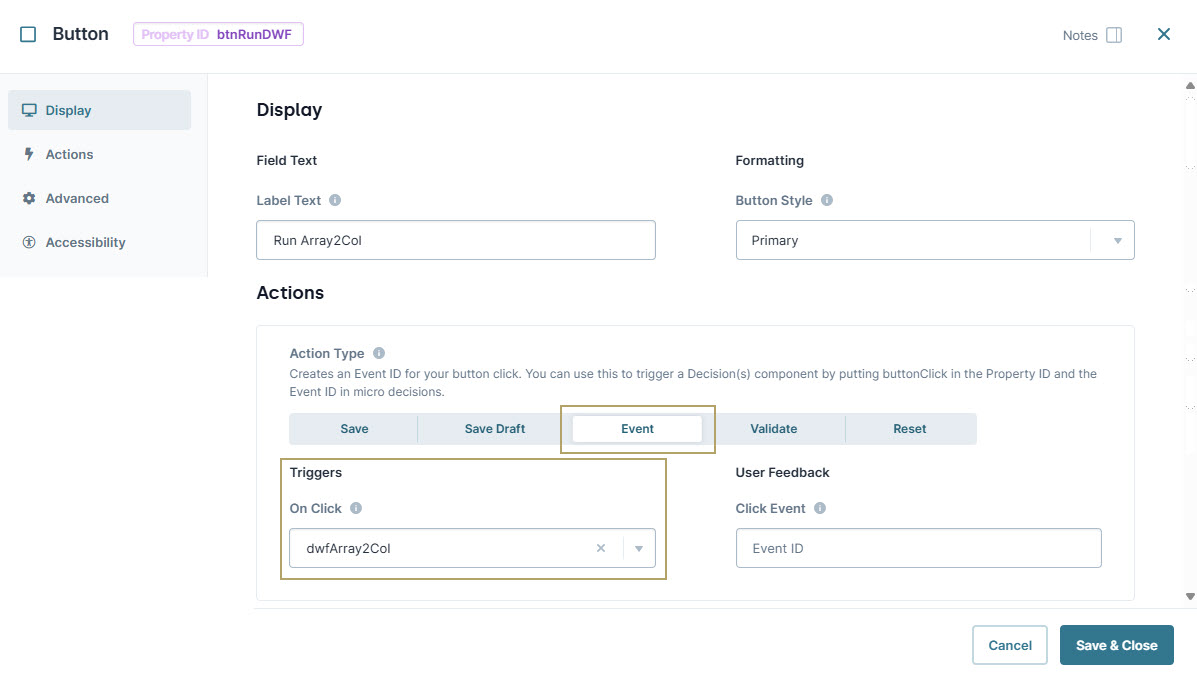
Configure the Button Component
Next, configure a Button component to trigger the dwfArray2ColData Workflow component in Express View Express View is how your end-user views your application. Express View also lets you preview your applications to test your configuration and view the styling. This is also the view your end-users will see when interacting with your application. After configuring a module, click Preview in the Module Builder to interact with the module in Express View..
| 1. | Drag and drop a |
| 2. | In the Property ID A Property ID is the unique field ID used by Unqork to track and link components in your module. field, enter btnRunDWF. |
| 3. | In the Label Text Label Text conveys what the input component is and what information it displays. Enter the purpose of the corresponding component or field. field, enter Run Array2Col. |
| 4. | From the Action Type drop-down, select Event. |
| 5. | From the On Click drop-down, select dwfArray2Col. |
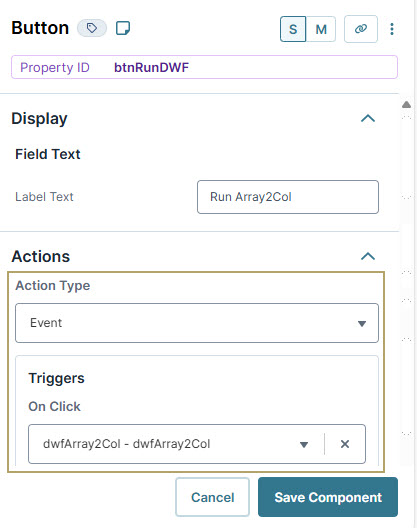
| 6. | Click Save Component. |
Configure the Initializer Component
Lastly, configure an Initializer component that triggers the dwfCreateArrayData Workflow component.
| 1. | Drag and drop a Initializer component onto your canvas, placing above the dtTableData Table component. |
| 3. | From the Trigger Type drop-down, select New Submission. |
| 4. | In the dwfArray2ColData Workflow component., enter the following: |
|
|
Source |
Type |
Value |
|---|---|---|---|
|
1 |
dwfCreateArray |
trigger |
GO |
| 5. | Click Save Component. |
| 6. | Save your module. |
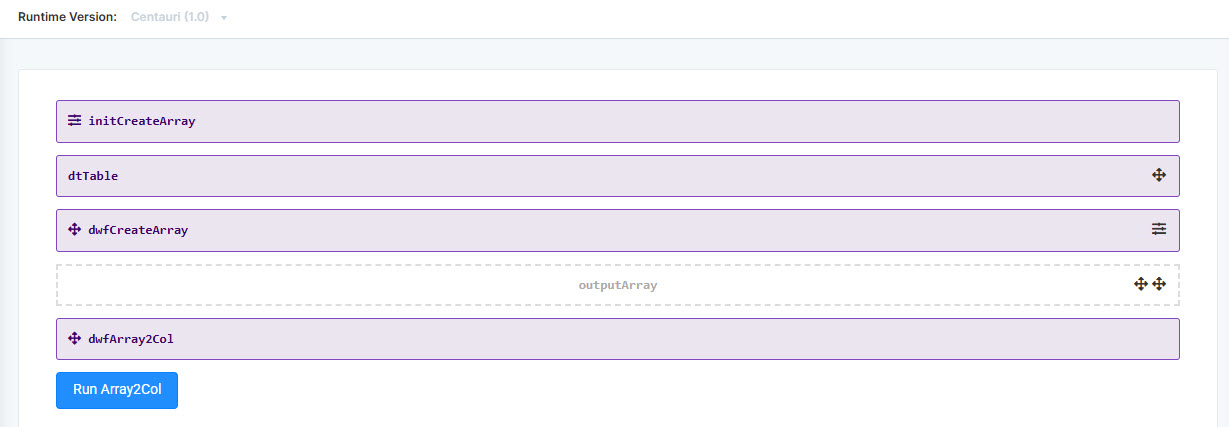
Here's how the completed example looks in the Module Builder:
Preview your module in Express View Express View is how your end-user views your application. Express View also lets you preview your applications to test your configuration and view the styling. This is also the view your end-users will see when interacting with your application. After configuring a module, click Preview in the Module Builder to interact with the module in Express View. and open the DevTools Console The DevTools Console helps you securely store, build, test, and deploy your software.. Run the Angular command The Angular command, or data command, is a tool that displays submission data in a browser's developer console. In Express View, enter the following command in the devtool console: angular.element('.unqorkio-form').scope().submission. Click Run Array2Col and view the results in the DevTools Console.
Overview
The Array2Col operator lets you convert an array An array is a type of object that stores one or more data types. Data types supported in arrays include numbers, strings, and objects. into a column of values in a table. In Unqork, a table is an indexed array of objects An object is a type of data structure that represents a single, self-contained entity that acts as a container for the characteristics of that entity.. So, the Array2Col operator transforms an array of values into an array of objects.
You'll find the Array2Col operator under the Array group to the left of your Data Workflow canvas
About the Info Window
Here's a breakdown of each setting in the Info window:
|
Setting |
Description |
|---|---|
|
Label |
Sets the label for your operator, displaying below the operator on your Data Workflow canvas. This field is optional, but set a label if you use more than one of the same operator type. A label helps you identify your operators without opening any Info windows. |
|
Preserve Argument Type |
When selected, this setting ensures the argument data type is respected when the operator executes. |
|
Key Name |
Each value in the array becomes an object, formatted in the following way: {"key":"value"}. Enter a name for the key you want to use in each object. |
Adding an Array2Col Operator
In this example, you'll configure a Data Table component to serve as an input source to the Array2Col operator. Then, build a Data Workflow that uses the Col2Array operator to convert the table into an array An array is a type of object that stores one or more data types. Data types supported in arrays include numbers, strings, and objects.. This array will connect to the Array2Col operator in a second Data Workflow. While components like the Multi-Select Dropdown component can generate arrays, this example focuses on creating an array using the Col2Array operator.
These instructions assume you have a new module open, saved, and with a title.
Configure the Data Table Component
Begin by creating a Data Table component with sample data you'll use to convert into an array.
| 1. | In the Module Builder, drag and drop a Data Table component onto your canvas. |
| 3. | In the data table, enter the following: |
|
A |
|
|---|---|
|
1 |
name |
|
2 |
Minna |
|
3 |
Veronika |
|
4 |
Theola |
|
5 |
Albina |
|
6 |
Ezekiel |
| 4. | Click Save. |
Configure the Hidden Component
Next, you'll configure a Hidden component to store the array output from the first Data Workflow component.
| 1. | Drag and drop a Hidden component onto your canvas, placing it below the Data Table component. |
| 3. | Click Save. |
Configure the First Data Workflow Component
Configure the first Data Workflow component to retrieve the stored data from the Data Table component. Then, use a Col2Array operator to create an array from the sample data in your Data Table component.
| 1. | Drag and drop a Data Workflow component onto your canvas, placing it between the dtTableData Table and outputArray Hidden components. |
Configure the Input Operator
| 1. | Drag and drop an Input operator onto your Data Workflow canvas. |
| 2. | Configure the operator's Info window as follows: |
|
Setting |
Value |
|---|---|
|
Category |
Input |
|
Component |
dtTable |
|
Required |
Yes |
|
Source |
Default |
Configure the Col2Array Operator
| 1. | Drag and drop a Col2Array operator onto your Data Workflow canvas. |
| 2. | Complete the operator's Info window as follows: |
|
Setting |
Value |
|---|---|
|
Category |
Col2Array |
|
Label |
Col2Array Name |
|
Drop Empty |
Yes |
|
Path |
name |
|
Default Value |
|
The value you'll enter in the Info window's Path field should match the column header in your Data Table component.
| 3. | Connect the output port (right) of the Input operator to the input port (left) of the Col2Array operator. |
Configure the Output Operator
| 1. | Drag and drop an Output operator onto your Data Workflow canvas. |
| 2. | Complete the operator's Info window as follows: |
|
Setting |
Value |
|---|---|
|
Category |
Output |
|
Label |
outputArray |
|
Action |
Value |
| 3. | Connect the output port (right) of the Col2Array operator to the input port (left) of the Output operator. |
| 4. | Click Save. |
Here's how the completed Data Workflow looks:
Configure the Second Data Workflow Component
Now set up a second Data Workflow component to test the Array2Col operator.
| 1. | Drag and drop a Data Workflow onto your canvas, placing it below the outputArrayHidden component. |
Configure the Input Operator
| 1. | Drag and drop an Input operator onto your Data Workflow canvas. |
| 2. | Configure the operator's Info window as follows: |
|
Setting |
Value |
|---|---|
|
Category |
Input |
|
Component |
outputArray |
|
Required |
Yes |
|
Source |
Default |
Configure the First Console Operator
Add a Console operator to view your data before it’s converted. This operator displays the input data in your browser’s DevTools Console The DevTools Console helps you securely store, build, test, and deploy your software.. Later, you'll add another Console operator to compare the data after it passes through the Array2Col operator.
| 1. | Drag and drop a Console operator onto your Data Workflow canvas. |
| 2. | Complete the operator's Info window as follows: |
|
Setting |
Value |
|---|---|
|
Category |
Console |
|
Label |
Before Array2Col |
| 3. | Connect the output port (right) of the Input operator to the input port (left) of the Console operator. |
Configure the Array2Col Operator
| 1. | Drag and drop an Array2Col operator onto your Data Workflow canvas. |
| 2. | Complete the operator's Info window as follows: |
|
Setting |
Value |
|---|---|
|
Category |
Array2Col |
|
Label |
Array2Col Name |
|
Key Name |
name |
The value you'll enter in the Info window's Key Name field will become the key in each key/value pair created from the array.
| 3. | Connect the output port (right) of the Input operator to the input port (left) of the Array2Col operator. |
Configure the Second Console Operator
Lastly, you'll add a Console operator to view the result after the data passes through the Array2Col operator. When creating applications, you might also want to use a dedicated Output operator. Then, you could connect that Output operator to a Hidden component. This would let you store the final values and reference them elsewhere in your application.
| 1. | Drag and drop a Console operator onto your Data Workflow canvas. |
| 2. | Complete the operator's Info window as follows: |
|
Setting |
Value |
|---|---|
|
Category |
Console |
|
Label |
After Array2Col |
| 3. | Connect the output port (right) of the Array2Col operator to the input port (left) of the After Array2Col Console operator. |
| 4. | Click Save. |
Here's how the completed Data Workflow looks:
Configure the Button Component
Next, configure a Button component to trigger the dwfArray2ColData Workflow component in Express View Express View is how your end-user views your application. Express View also lets you preview your applications to test your configuration and view the styling. This is also the view your end-users will see when interacting with your application. After configuring a module, click Preview in the Module Builder to interact with the module in Express View..
| 1. | Drag and drop a |
| 2. | In the Property ID A Property ID is the unique field ID used by Unqork to track and link components in your module. field, enter btnRunDWF. |
| 3. | In the Label Text Label Text conveys what the input component is and what information it displays. Enter the purpose of the corresponding component or field. field, enter Run Array2Col. |
| 4. | To the left of the component's configuration window, click |
| 5. | Set the Action Type as Event. |
| 6. | From the On Click drop-down, select dwfArray2Col. |
| 7. | Click Save & Close. |
Configure the Initializer Component
Lastly, configure an Initializer component that triggers the dwfCreateArrayData Workflow component.
| 1. | Drag and drop a Initializer component onto your canvas, placing above the dtTableData Table component. |
| 3. | From the Trigger Type drop-down, select New Submission. |
| 4. | In the Outputs table, enter the following: |
|
|
Property ID |
Type |
Value |
|---|---|---|---|
|
1 |
dwfCreateArray |
trigger |
GO |
| 5. | Click Save & Close. |
| 6. | Save your module. |
Below is the completed configuration in the Module Builder:
Preview your module in Express View Express View is how your end-user views your application. Express View also lets you preview your applications to test your configuration and view the styling. This is also the view your end-users will see when interacting with your application. After configuring a module, click Preview in the Module Builder to interact with the module in Express View. and open the DevTools Console The DevTools Console helps you securely store, build, test, and deploy your software.. Run the Angular command The Angular command, or data command, is a tool that displays submission data in a browser's developer console. In Express View, enter the following command in the devtool console: angular.element('.unqorkio-form').scope().submission. Click Run Array2Col and view the results in the DevTools Console.
