Rename Field Operator
Overview
The Rename Field operator updates key names in your data, making it easier to identify and reference fields throughout your Data Workflow.
When you store data in your application, it’s typically organized into arrays An array is a type of object that stores one or more data types. Data types supported in arrays include numbers, strings, and objects.. Each array contains fields and values known as key/value pairs A key-value pair is a fundamental data structure where a unique "key" is associated with a specific "value," used for organizing and retrieving data efficiently, like in dictionaries or databases.. These fields are used to locate and modify data.
Data can come from sources like APIs APIs (application programming interfaces) are a set of protocols and definitions developers use to build and integrate application software. APIs act as the connective tissue between products and services. or Data collection A Data Collection is any static data referenced by your application. components, like a Data Table component. Typically, these fields are automatically generated and can be difficult to understand. For example, a field might be named 1234_name, which is not easy to recognize or reference. The Rename Field operator lets you change those names to be more meaningful, like employeeName.
You'll find the Rename Field operator under the Table operators group to the left of the Data Workflow canvas.
About the Info Window
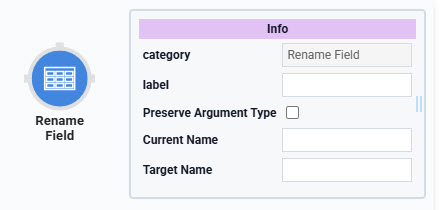
Here's a breakdown of each setting in the Rename Field operator's Info window:
|
Info |
|
|---|---|
|
Category |
Grayed out and non-adjustable setting indicating the operation type. |
|
Label |
Sets the label for your operator, displaying below the operator on your Data Workflow canvas. This field is optional, but set a label if you use more than one of the same operator type. A label helps you identify your operators without opening any Info windows. |
|
Preserve Argument Type |
When selected, this setting ensures the argument data type is respected when the operator executes. |
|
Current Name |
Enter the current name of the field you want to rename. |
|
Target Name |
Enter the new name you want to use to replace the Current Name value. |
Current Name and Target Name settings can only have one string, formula, or argument value. You can use the same formulas you'd use in a Calculator component. For more information on formulas, view our Unqork Formulas article.
Adding a Rename Field Operator
In this example, you'll use the Rename Field operator to update a field name in a Data Table component. This example uses an interactive approach, where the end-user End-users, also known as Express Users, are the individuals accessing an application through Express View. In most cases, end-users are the customers using the product. can enter the field name they want.
These instructions assume you have a new module open and saved with a title.
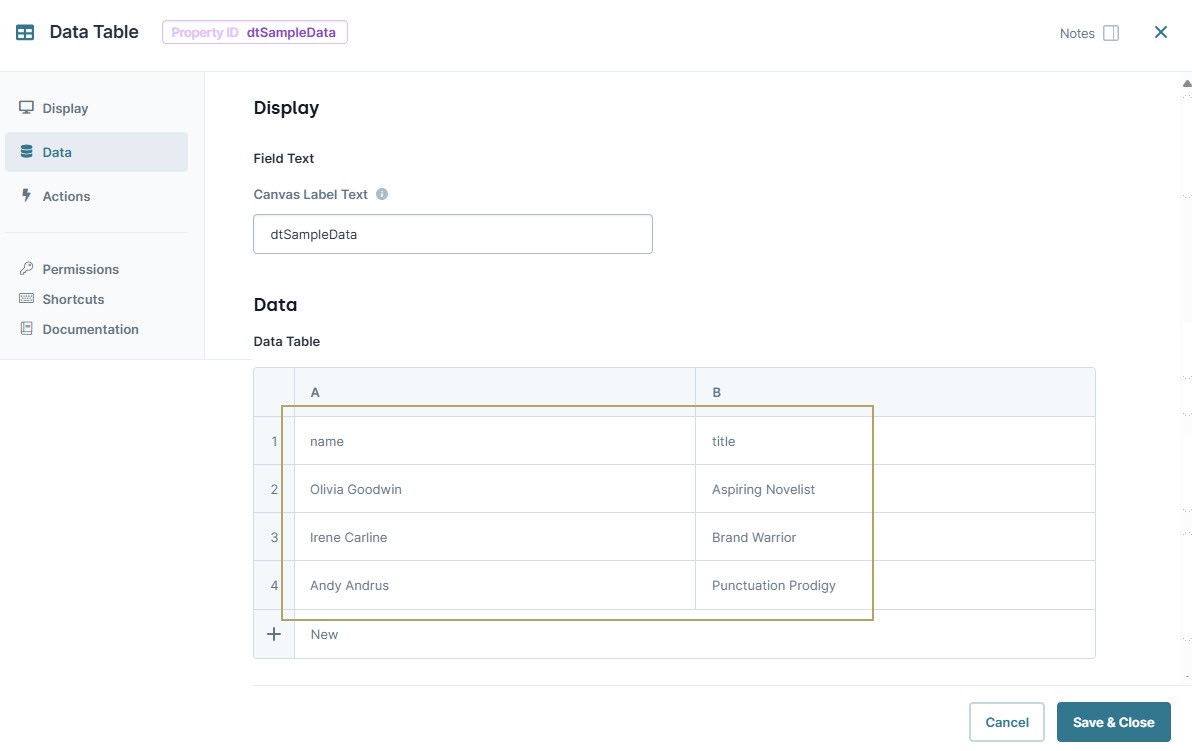
Configure the Data Table Component
You'll begin by adding a Data Table component and populate it with sample fields you'll rename.
| 1. | In the Module Builder, drag and drop a  Data Table component onto your canvas. Data Table component onto your canvas. |
| 2. | In the Property ID A Property ID is the unique field ID used by Unqork to track and link components in your module. field, enter dtSampleData. |
| 3. | In the data table, enter the following: |
|
A |
B | |
|---|---|---|
|
1 |
name |
title |
|
2 |
Olivia Goodwin |
Aspiring Novelist |
|
3 |
Irene Carline |
Brand Warrior |
|
4 |
Andy Andrus |
Punctuation Prodigy |
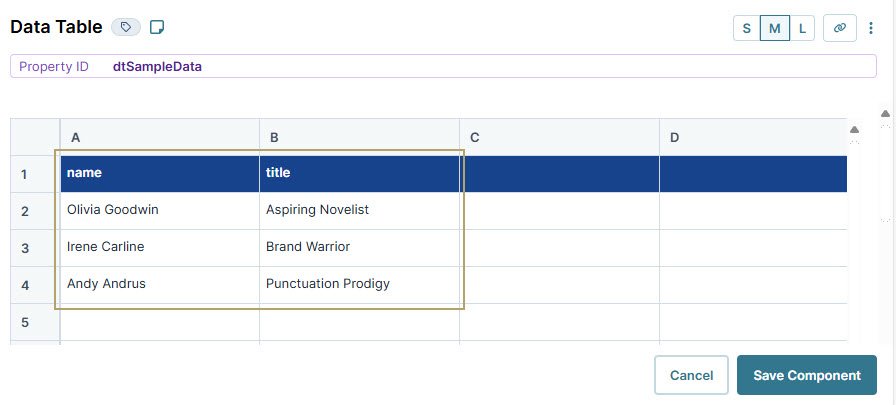
| 4. | Click Save Component. |
Configure the Text Field Component
Next, you'll configure a Text Field component where your end-users End-users, also known as Express Users, are the individuals accessing an application through Express View. In most cases, end-users are the customers using the product. can change the field name.
| 1. | Drag and drop a Text Field component onto your canvas, placing it below the Data Table component. |
| 2. | In the Property ID A Property ID is the unique field ID used by Unqork to track and link components in your module. field, enter newNameTitleField. |
| 3. | In the Label Text Label Text conveys what the input component is and what information it displays. Enter the purpose of the corresponding component or field., enter New Name for Field "Title". |
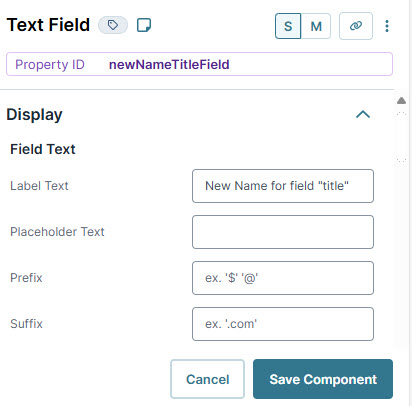
| 4. | Click Save Component. |
Configure the Data Workflow Component
Next, you'll set up the Data Workflow component, which uses the Text Field component's entry to rename your data field.
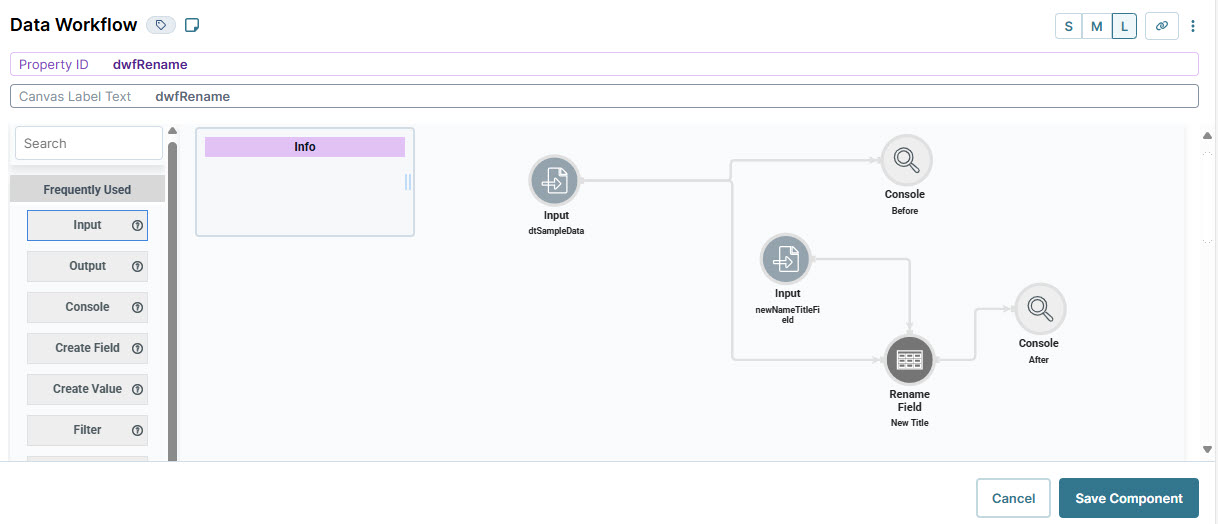
| 1. | Drag and drop a Data Workflow onto your canvas, placing it below the newNameTitleField Text Field component. |
Configure the Input Operators
| 1. | Drag and drop an Input operator onto your Data Workflow canvas. |
| 2. | Configure the operator's Info window as follows: |
|
Info |
|
|---|---|
|
Category |
Input |
|
Component |
dtSampleData |
|
Required |
Yes |
|
Source |
Default |
| 3. | Drag and drop a second Input operator onto your Data Workflow canvas. |
| 4. | Configure the second operator's Info window as follows: |
|
Info |
|
|---|---|
|
Category |
Input |
|
Component |
newNameTitleField |
|
Required |
Yes |
|
Source |
Default |
Configure the Rename Field Operator
| 1. | Drag and drop a Rename Field operator onto your Data Workflow canvas. |
| 2. | Configure the operator's Info window as follows: |
|
Info |
|
|---|---|
|
Category |
Rename Field |
|
Label |
New Title |
|
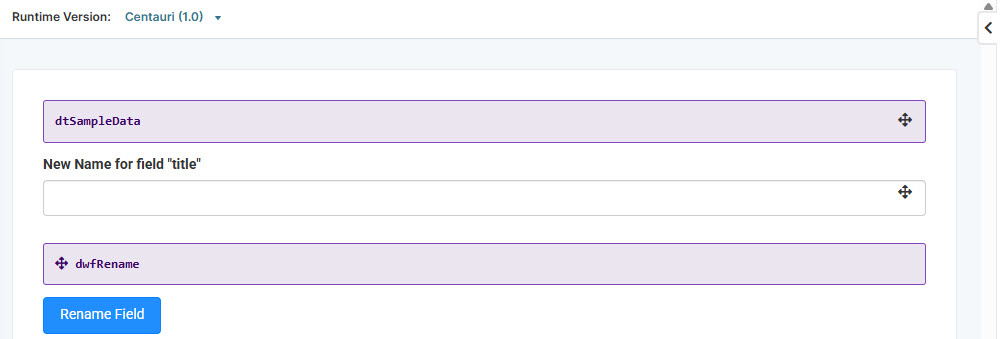
Current Name |
title |
|
Target Name |
_arg |
Connecting the Text Field component to the argument port (top) of the Rename Field operator uses the Text Field component entry to rename the Current Name data field.
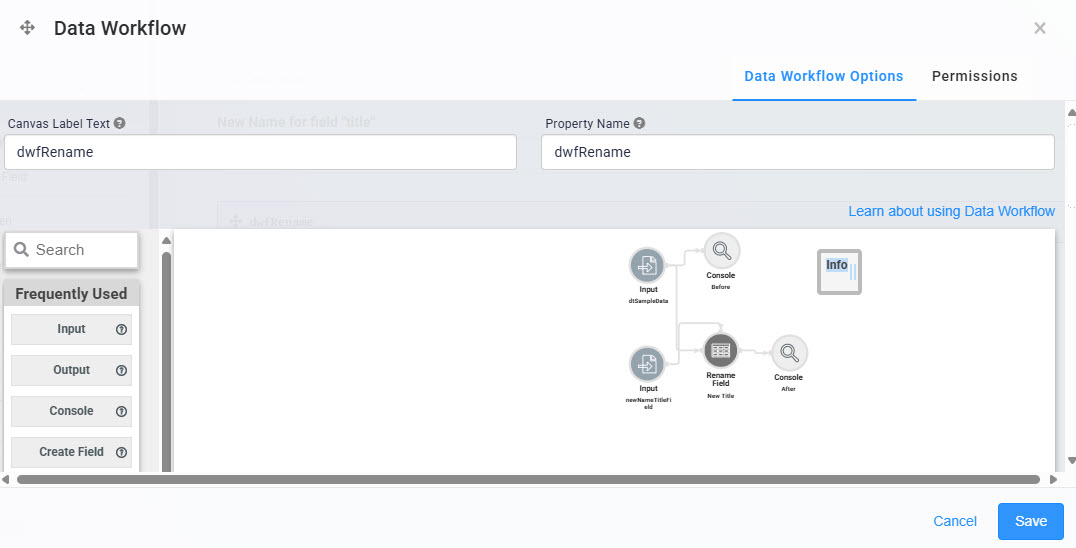
| 3. | Connect the output port (right) of the dtSampleData Input operator to the input port (left) of the New TitleRename Field operator. |
| 4. | Connect the output port (right) of the newNameTitleField Input operator to the argument port (top) of the New TitleRename Field operator. |
Configure the First Console Operator
Now, add a Console operator before the Rename Field operator to view the current field name in the DevTools Console The DevTools Console helps you securely store, build, test, and deploy your software..
| 1. | Drag and drop a Console operator onto your Data Workflow canvas. |
| 2. | Configure the operator's Info window as follows: |
|
Info |
|
|---|---|
|
Category |
Console |
|
Label |
Before |
| 3. | Connect the output port (right) of the dtSampleData Input operator to the input port (left) of the Before Console operator. |
Configure the Second Console Operator
Then, add a second Console operator to view the new field name after the data passes through the Rename Field operator.
| 1. | Drag and drop another Console operator onto your Data Workflow canvas. |
| 2. | Configure the operator's Info window as follows: |
|
Info |
|
|---|---|
|
Category |
Console |
|
Label |
After |
| 3. | Connect the output port (right) of the New TitleRename Field operator to the input port (left) of the After Console operator. |
| 4. | Click Save Component. |
Configure the Button Component
Lastly, configure a Button component to trigger the Data Workflow in Express View Express View is how your end-user views your application. Express View also lets you preview your applications to test your configuration and view the styling. This is also the view your end-users will see when interacting with your application. After configuring a module, click Preview in the Module Builder to interact with the module in Express View..
| 1. | Drag and drop a |
| 2. | In the Property ID A Property ID is the unique field ID used by Unqork to track and link components in your module. field, enter btnRename. |
| 3. | In the Label Text Label Text conveys what the input component is and what information it displays. Enter the purpose of the corresponding component or field. field, enter Rename Field. |
| 4. | From the Action Type drop-down, select Event. |
| 5. | From the On Click drop-down, select dwfRename. |
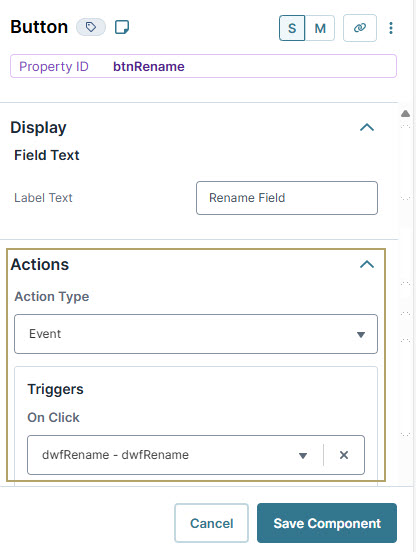
| 6. | Click Save Component. |
| 7. | Save your module. |
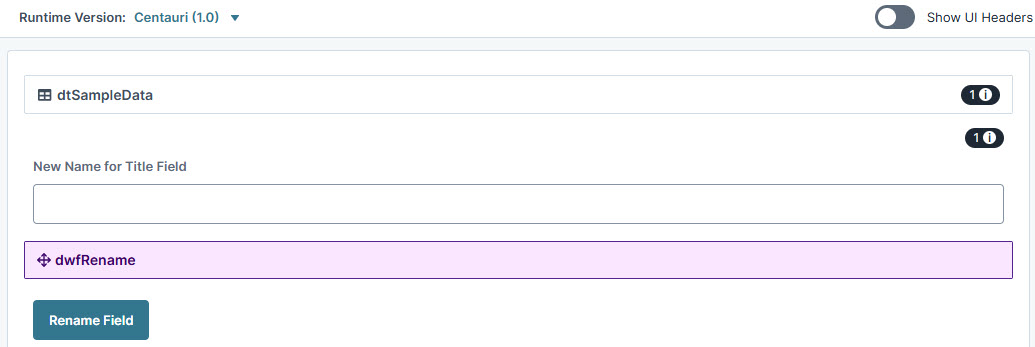
Here's how the completed example looks in the Module Builder:
Preview your module in Express View Express View is how your end-user views your application. Express View also lets you preview your applications to test your configuration and view the styling. This is also the view your end-users will see when interacting with your application. After configuring a module, click Preview in the Module Builder to interact with the module in Express View. and open the DevTools Console The DevTools Console helps you securely store, build, test, and deploy your software.. Run the Angular command The Angular command, or data command, is a tool that displays submission data in a browser's developer console. In Express View, enter the following command in the devtool console: angular.element('.unqorkio-form').scope().submission, enter a new name for the title field, and Rename Field to view the results.

Overview
The Rename Field operator updates key names in your data, making it easier to identify and reference fields throughout your Data Workflow.
When you store data in your application, it’s typically organized into arrays An array is a type of object that stores one or more data types. Data types supported in arrays include numbers, strings, and objects.. Each array contains fields and values known as key/value pairs A key-value pair is a fundamental data structure where a unique "key" is associated with a specific "value," used for organizing and retrieving data efficiently, like in dictionaries or databases.. These fields are used to locate and modify data.
Data can come from sources like APIs APIs (application programming interfaces) are a set of protocols and definitions developers use to build and integrate application software. APIs act as the connective tissue between products and services. or Data collection A Data Collection is any static data referenced by your application. components, like a Data Table component. Typically, these fields are automatically generated and can be difficult to understand. For example, a field might be named 1234_name, which is not easy to recognize or reference. The Rename Field operator lets you change those names to be more meaningful, like employeeName.
You'll find the Rename Field operator under the Table operators group to the left of the Data Workflow canvas.
About the Info Window
Here's a breakdown of each setting in the Rename Field operator's Info window:
|
Setting |
Description |
|---|---|
|
Category |
Grayed out and non-adjustable setting indicating the operation type. |
|
Label |
Sets the label for your operator, displaying below the operator on your Data Workflow canvas. This field is optional, but set a label if you use more than one of the same operator type. A label helps you identify your operators without opening any Info windows. |
|
Preserve Argument Type |
When selected, this setting ensures the argument data type is respected when the operator executes. |
|
Current Name |
Enter the current name of the field you want to rename. |
|
Target Name |
Enter the new name you want to use to replace the Current Name value. |
Current Name and Target Name settings can only have one string, formula, or argument value. You can use the same formulas you'd use in a Calculator component. For more information on formulas, view our Unqork Formulas article.
Adding a Rename Field Operator
In this example, you'll use the Rename Field operator to update a field name in a Data Table component. This example uses an interactive approach, where the end-user End-users, also known as Express Users, are the individuals accessing an application through Express View. In most cases, end-users are the customers using the product. can enter the field name they want.
These instructions assume you have a new module open and saved with a title.
Configure the Data Table Component
You'll begin by adding a Data Table component and populate it with sample fields you'll rename.
| 1. | In the Module Builder, drag and drop a Data Table component onto your canvas. |
| 3. | To the left of the component's configuration window, click Data. |
| 4. | In the data table, enter the following: |
|
A |
B |
|---|---|
|
name |
title |
|
Olivia Goodwin |
Aspiring Novelist |
|
Irene Carline |
Brand Warrior |
|
Andy Andrus |
Punctuation Prodigy |
| 5. | Click Save & Close. |
Configure the Text Field Component
Next, you'll configure a Text Field component where your end-users End-users, also known as Express Users, are the individuals accessing an application through Express View. In most cases, end-users are the customers using the product. can change the field name.
| 1. | Drag and drop a Text Field component onto your canvas, placing it below the Data Table component. |
| 2. | In the Property ID A Property ID is the unique field ID used by Unqork to track and link components in your module. field, enter newNameTitleField. |
| 3. | In the Label Text Label Text conveys what the input component is and what information it displays. Enter the purpose of the corresponding component or field., enter New Name for Field "Title". |

| 4. | Click Save & Close. |
Configure the Data Workflow Component
Next, you'll set up the Data Workflow component, which uses the Text Field component's entry to rename your data field.
| 1. | Drag and drop a Data Workflow onto your canvas, placing it below the newNameTitleField Text Field component. |
Configure the Input Operators
| 1. | Drag and drop an Input operator onto your Data Workflow canvas. |
| 2. | Configure the operator's Info window as follows: |
|
Setting |
Value |
|---|---|
|
Category |
Input |
|
Component |
dtSampleData |
|
Required |
Yes |
|
Source |
Default |
| 3. | Drag and drop the second Input operator onto your Data Workflow canvas. |
| 4. | Configure the second operator's Info window as follows: |
|
Setting |
Value |
|---|---|
|
Category |
Input |
|
Component |
newNameTitleField |
|
Required |
Yes |
|
Source |
Default |
Configure the Rename Field Operator
| 1. | Drag and drop the Rename Field operator onto your Data Workflow canvas. |
| 2. | Configure the operator's Info window as follows: |
|
Setting |
Value |
|---|---|
|
Category |
Rename Field |
|
Label |
New Title |
|
Current Name |
title |
|
Target Name |
_arg |
Connecting the Text Field component to the argument port (top) of the Rename Field operator uses the Text Field component entry to rename the Current Name data field.
| 3. | Connect the output port (right) of the dtSampleData Input operator to the input port (left) of the New TitleRename Field operator. |
| 4. | Connect the output port (right) of the newNameTitleField Input operator to the argument port (top) of the New TitleRename Field operator. |
Configure the First Console Operator
Now, add a Console operator before the Rename Field operator to view the current field name in the DevTools Console The DevTools Console helps you securely store, build, test, and deploy your software..
| 1. | Drag and drop a Console operator onto your Data Workflow canvas. |
| 2. | Configure the operator's Info window as follows: |
|
Setting |
Value |
|---|---|
|
Category |
Console |
|
Label |
Before |
| 3. | Connect the output port (right) of the dtSampleData Input operator to the input port (left) of the Before Console operator. |
Configure the Second Console Operator
Then, add a second Console operator to view the new field name after the data passes through the Rename Field operator.
| 1. | Drag and drop another Console operator onto your Data Workflow canvas. |
| 2. | Configure the operator's Info window as follows: |
|
Setting |
Value |
|---|---|
|
Category |
Console |
|
Label |
After |
| 3. | Connect the output port (right) of the New TitleRename Field operator to the input port (left) of the After Console operator. |
| 4. | Click Save. |
Here's how the completed Data Workflow looks:
Configure the Button Component
Lastly, configure a Button component to trigger the Data Workflow in Express View Express View is how your end-user views your application. Express View also lets you preview your applications to test your configuration and view the styling. This is also the view your end-users will see when interacting with your application. After configuring a module, click Preview in the Module Builder to interact with the module in Express View..
| 1. | Drag and drop a |
| 2. | In the Property ID A Property ID is the unique field ID used by Unqork to track and link components in your module. field, enter btnRename. |
| 3. | In the Label Text Label Text conveys what the input component is and what information it displays. Enter the purpose of the corresponding component or field. field, enter Rename Field. |
| 4. | To the left of the component's configuration window, click |
| 5. | Set the Action Type as Event. |
| 6. | From the On Click drop-down, select dwfRename. |

| 7. | Click Save & Close. |
| 8. | Save your module |
Here's how the completed example looks in the Module Builder:
Preview your module in Express View Express View is how your end-user views your application. Express View also lets you preview your applications to test your configuration and view the styling. This is also the view your end-users will see when interacting with your application. After configuring a module, click Preview in the Module Builder to interact with the module in Express View. and open the DevTools Console The DevTools Console helps you securely store, build, test, and deploy your software.. Run the Angular command The Angular command, or data command, is a tool that displays submission data in a browser's developer console. In Express View, enter the following command in the devtool console: angular.element('.unqorkio-form').scope().submission, enter a new name for the title field, and Rename Field to view the results.
